
While playing around with fine-tuning for OpenAI’s GPT Large Language Models, I found I needed a tool for formatting messages. There are many fine posts out there about formatting datasets, but they mostly involve specific datasets or setups. I wanted something where I could enter in the system message, user message, and assistant message, and have it placed in the messages object format used by the OpenAI fine-tuning API endpoint.
So, in consultation with GPT-4o, I give you my small-scale dataset formatter. It is a simple web interface built with the Flask development framework in Python. There is a little fluff in there related to the fact I was developing on a Windows system, but it should work fine on any OS with Python installed.
OpenAI Chat Message Format explained
When data is formatted for use in a dataset with the OpenAI fine-tuning API, it is sent as a JSON object containing a list of messages. Each message has a role: system, user, or assistant, as well as a content key containing the actual message to the model (a.k.a. the prompt).
A “conversation” with GPT is a series of user messages and assistant messages, usually starting with a system prompt.
[
  {
    "messages": [
      {
        "role": "system",
        "content": "You are a helpful assistant."
      },
      {
        "role": "user",
        "content": "Bok like a chicken!"
      },
      {
        "role": "assistant",
        "content": "Bok! Bok bok bok BEEGOK!!!"
      }
    ]
  }
]
Multi-turn conversations include more user and assistant messages. The dataset builder includes an “Add turn” button to add additional rounds to the conversation. The result looks like so:
  {
    "messages": [
      {
        "role": "system",
        "content": "You are a helpful assistant."
      },
      {
        "role": "user",
        "content": "Bok like a chicken!"
      },
      {
        "role": "assistant",
        "content": "Bok! Bok bok bok BEEGOK!!!"
      },
      {
        "role": "user",
        "content": "Ok now woof like a dog!"
      },
      {
        "role": "assistant",
        "content": "Woof! Woof! Woof-woof! Woof woof woof!"
      }
    ]
  }
There is also a weight parameter, which can be used to tell the model to disregard an assistant message. This is useful if you want a conversation to show the user correcting the model. You can set the incorrect response weight to 0, and the correct response weight to 1.
{
    "messages": [
      {
        "role": "system",
        "content": "You are a helpful assistant."
      },
      {
        "role": "user",
        "content": "Bok like a chicken!"
      },
      {
        "role": "assistant",
        "content": "Woof! Woof woof woof!",
        "weight": 0
      },
      {
        "role": "user",
        "content": "What?  Dogs say \"woof\"!  I asked for a chicken."
      },
      {
        "role": "assistant",
        "content": "Bok, bok bok bok!"
      }
    ]
  }
LLM-Dataset-Builder Installation and Usage
The source code can be found on git at https://github.com/Make-A-Face-Publishing/llm-dataset-builder/ for anyone who wants to play with it.
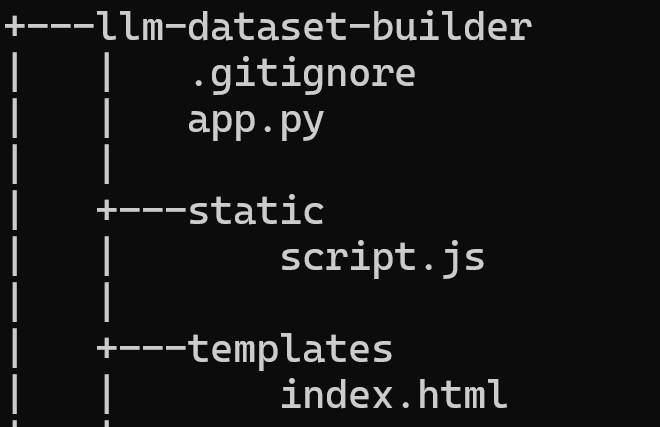
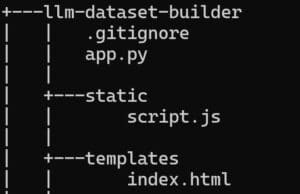
It’s comprised of 3 files, an index.html file, the app.py Python source file, and the script.js javascript that handles the user interface.
The directory structure should look like this if you install manually:
Included below is the full README.md:
LLM Dataset Builder Flask App
Overview
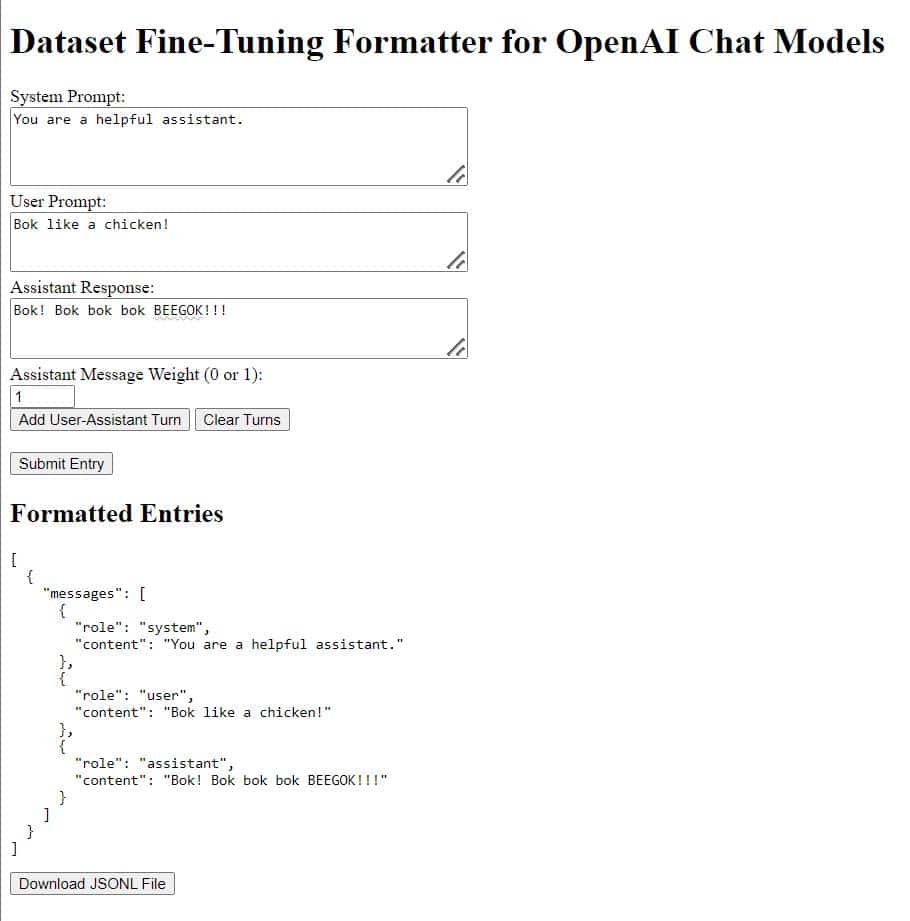
This Flask application provides an interface for formatting conversation data for use with the OpenAI API’s fine-tuning for chat models. The app allows users to input a system prompt, multiple user prompts, and assistant responses. The data is formatted into the required JSON structure and can be downloaded as a .jsonl file directly from the browser. This application is designed to help prepare datasets for fine-tuning language models with structured conversations.
Features
- Dynamic Form: Add and remove user-assistant turns dynamically.
- JSON Formatting: The input data is formatted into the required JSON structure with an optional assistant message weight.
- Downloadable Output: The formatted conversations can be downloaded as a
.jsonlfile directly from the browser. - Browser-side Data Handling: The dataset is stored in the user’s client until the download button is pressed.
Requirements
To run this application, you need the following:
- Python 3.7+
- Flask (Python web framework)
- A modern web browser
Python Dependencies
The required Python packages can be installed using pip. The dependencies include:
- Flask
Install the dependencies by running:
pip install FlaskDirectory Structure
The directory structure for this application:
llm-dataset-builder/
│
├── app.py                  # Main Flask application script
├── static/
│   └── script.js           # JavaScript file for dynamic form interactions
└── templates/
└── index.html # HTML template for the app's interface- app.py: The main application script containing the Flask routes and logic.
- static/script.js: The JavaScript file that handles dynamic form interactions.
- templates/index.html: The HTML template for the web interface.
Running the Application
- Clone the Repository:
   git clone https://github.com/your-username/llm-dataset-builder.git
cd llm-dataset-builder- Install Flask:
pip install Flask- Run the Flask Application:
flask runOR
python app.py- Access the App:
Open your web browser and navigate tohttp://127.0.0.1:5000/to use the application.
Notes
- The
/saveroute is included for those who wish to save formatted entries on the server-side. This feature is not currently integrated into the UI but is available for extending the app’s functionality.
Or if anyone just wants the source, you can grab it here:
index.html
<!DOCTYPE html>
<html lang="en">
<head>
    <meta charset="UTF-8">
    <meta name="viewport" content="width=device-width, initial-scale=1.0">
    <title>Fine-Tuning Dataset Formatter for OpenAI Chat LLMs</title>
    <script src="static/script.js" defer></script> <!-- Reference to the external JS file -->
</head>
<body>
    <h1>Dataset Fine-Tuning Formatter for OpenAI Chat Models</h1>

    <form id="entryForm">
        <div>
            <label for="system_prompt">System Prompt:</label><br>
            <textarea id="system_prompt" name="system_prompt" rows="4" cols="50"></textarea>
        </div>

        <div id="turns"></div>

        <button type="button" onclick="addTurn()">Add User-Assistant Turn</button>
        <button type="button" onclick="clearTurns()">Clear Turns</button><br><br>
        <button type="button" onclick="formatEntry()">Submit Entry</button>
    </form>

    <h2>Formatted Entries</h2>
    <pre id="formattedEntries"></pre>

    <button type="button" onclick="downloadFile()">Download JSONL File</button>
</body>
</html>
app.py
from flask import Flask, render_template, request, jsonify
import json

app = Flask(__name__)

# Custom JSON Encoder to ensure 'role' is always the first key in the output
class OrderedEncoder(json.JSONEncoder):
    def encode(self, o):
        if isinstance(o, list):
            # Encode each element of the list
            return "[" + ", ".join(self.encode(i) for i in o) + "]"
        elif isinstance(o, dict):
            # Sort dictionary items so that 'role' appears first
            items = o.items()
            ordered_items = sorted(items, key=lambda item: (item[0] != 'role', item[0]))
            # Encode the ordered dictionary items
            return "{" + ", ".join(f'"{key}": {self.encode(value)}' for key, value in ordered_items) + "}"
        else:
            # Default encoding for other types
            return super().encode(o)

# Route to display the main form to the user
@app.route('/')
def index():
    # Renders the HTML template 'index.html'
    return render_template('index.html')

# Route to process the form data and return the formatted JSON structure
@app.route('/format', methods=['POST'])
def format_entry():
    # Get the system prompt from the form and normalize line endings
    system_prompt = request.form['system_prompt'].replace('\r\n', '\n')
    # Get all user prompts and normalize line endings
    user_prompts = [p.replace('\r\n', '\n') for p in request.form.getlist('user_prompt[]')]
    # Get all assistant responses and normalize line endings
    assistant_responses = [r.replace('\r\n', '\n') for r in request.form.getlist('assistant_response[]')]
    # Get all assistant message weights
    assistant_weights = request.form.getlist('assistant_weight[]')

    # Initialize the formatted entry structure
    formatted_entry = {"messages": []}
    # Add the system message as the first message in the sequence
    formatted_entry["messages"].append({"role": "system", "content": system_prompt})

    # Iterate through each user-assistant pair to add to the message sequence
    for user_prompt, assistant_response, weight in zip(user_prompts, assistant_responses, assistant_weights):
        # Add user prompt
        formatted_entry["messages"].append({"role": "user", "content": user_prompt})
        # Add assistant response with an optional weight
        assistant_message = {"role": "assistant", "content": assistant_response}
        if weight == "0":
            assistant_message["weight"] = 0  # Only include weight if it's 0
        formatted_entry["messages"].append(assistant_message)

    # Return the formatted entry as JSON
    return jsonify(formatted_entry)

# Route to save the formatted entries to a server-side file (not currently hooked up in the UI)
# Note: This route is left in case server-side storage is desired.
@app.route('/save', methods=['POST'])
def save_entry():
    entries = request.json.get('entries', [])

    # Open the file in append mode, ensuring each entry is on a new line
    with open('conversations.jsonl', 'a', newline='\n') as f:
        for entry in entries:
            # Serialize each entry using the custom OrderedEncoder
            json_str = json.dumps(entry, cls=OrderedEncoder)
            f.write(json_str + '\n')  # Write each entry to the file

    # Return a success status
    return jsonify({"status": "success", "message": "Entries saved to conversations.jsonl"})

# Entry point for the Flask application
if __name__ == '__main__':
    # Run the app in debug mode to enable auto-reloading and detailed error pages
    app.run(debug=True)
script.js
function addTurn() {
    const turnDiv = document.createElement('div');
    turnDiv.classList.add('turn');

    const userLabel = document.createElement('label');
    userLabel.textContent = 'User Prompt:';
    const userTextarea = document.createElement('textarea');
    userTextarea.name = 'user_prompt[]';
    userTextarea.rows = 3;
    userTextarea.cols = 50;

    const assistantLabel = document.createElement('label');
    assistantLabel.textContent = 'Assistant Response:';
    const assistantTextarea = document.createElement('textarea');
    assistantTextarea.name = 'assistant_response[]';
    assistantTextarea.rows = 3;
    assistantTextarea.cols = 50;

    const weightLabel = document.createElement('label');
    weightLabel.textContent = 'Assistant Message Weight (0 or 1):';
    const weightInput = document.createElement('input');
    weightInput.type = 'number';
    weightInput.name = 'assistant_weight[]';
    weightInput.value = 1; // Default weight is 1
    weightInput.min = 0;
    weightInput.max = 1;

    turnDiv.appendChild(userLabel);
    turnDiv.appendChild(document.createElement('br'));
    turnDiv.appendChild(userTextarea);
    turnDiv.appendChild(document.createElement('br'));
    turnDiv.appendChild(assistantLabel);
    turnDiv.appendChild(document.createElement('br'));
    turnDiv.appendChild(assistantTextarea);
    turnDiv.appendChild(document.createElement('br'));
    turnDiv.appendChild(weightLabel);
    turnDiv.appendChild(document.createElement('br'));
    turnDiv.appendChild(weightInput);
    turnDiv.appendChild(document.createElement('br'));

    document.getElementById('turns').appendChild(turnDiv);
}

function clearTurns() {
    const turnsDiv = document.getElementById('turns');
    while (turnsDiv.children.length > 1) {
        turnsDiv.removeChild(turnsDiv.lastChild);
    }
}

function formatEntry() {
    const formData = new FormData(document.getElementById('entryForm'));

    fetch('/format', {
        method: 'POST',
        body: formData
    })
    .then(response => response.json())
    .then(data => {
        const orderedData = {
            messages: data.messages.map(message => ({
                role: message.role,
                content: message.content,
                ...(message.weight !== undefined ? { weight: message.weight } : {})
            }))
        };

        entries.push(orderedData);
        document.getElementById('formattedEntries').textContent = JSON.stringify(entries, null, 2);
    });
}

function downloadFile() {
    const blob = new Blob(entries.map(entry => JSON.stringify(entry) + '\n'), { type: 'application/jsonl' });
    const url = URL.createObjectURL(blob);
    const a = document.createElement('a');
    a.href = url;
    a.download = 'conversations.jsonl';
    a.click();
    URL.revokeObjectURL(url);
}

let entries = [];

// Automatically add the first user-assistant turn when the page loads
window.onload = function() {
    addTurn();
};
License
As more of it was written by GPT than me, and there are probably much more elegant solutions out there, this is public domain code.
Until next time. Cheers! – D.D.